Welcome To Openworld FlashPresenter Welcome To Openworld FlashPresenter
Samples Gallery Download
 Download Openworld FlashPresenter Now! Download Openworld FlashPresenter Now!
Overview
Openworld FlashPresenter Features
Getting Started with Openworld FlashPresenter
Your Presentation Screen
PowerPoint Import
PowerPoint Import Wizard Step 1 - Open Presentation Step 2 - PowerPoint Slide Narration
Step 3 - Narration Results PowerPoint Import Preferences
Creating New Presentation
Getting Started Video Setup Video Encoding Setup Transcript Setup Slides Setup
Media Synchronization
Synchronization Overview
Editing Transcript
Synchronizing the Transcript
Contents Creation
Synchronizing Slides
Synchronizing Speakers
Hyperlinks and Resources Links Creation
Synchronizing Hyperlinks and Resources Links
Glossary Building
Creating Quizzes
New Quiz Creation Quiz Properties Setup Quiz Customization Quiz Results Processing
Presentation Export
 Exporting Your Presentation Exporting Your Presentation
Using HTTP Streaming technology for video/audio
delivery
Flash Media Server
Configuration Basics
Accompanying Tools
Video Converter Video Joiner Video Encoding Preferences MP3 To FLV Converter MP3 Compressor Audio Uncompressor MP3 Sound Recorder
Support
DEMO Mode Limitations Software Activation and Order Information
Contact Information
Credits |
|
Exporting Your Presentation
1. Fine-tuning Your Presentation.
Openworld Flash Presenter offers several ways to polish and customize the
appearance of your presentation. You can choose one or more of these
advanced options before you export your presentation for public viewing.
 Add a Logo:
You can display a custom image in JPEG or PNG format having
maximum dimensions of 200 x 160 pixels on your presentation.
Semi-transparent images in PNG format can also be used. Add a Logo:
You can display a custom image in JPEG or PNG format having
maximum dimensions of 200 x 160 pixels on your presentation.
Semi-transparent images in PNG format can also be used.
Use a still photo (with audio) of the speaker:
In cases where you are using an Audio-only (rather than Video/Audio) track
as the basis for yourpresentation, you can assign a still photo of the speaker
to appear while the audio plays. The speaker image can be in JPEG or PNG format
with maximum dimensions of 192 x 176 pixels.
Apply a background "sound track":
You can also include a background music or other sound track that can play
while the speaker is narrating a presentation. The background sound is stopped
automatically when user clicks "Pause" or "Stop" buttons. To create a
background track, you can assign a small MP3 audio clip which will continuously
cycle while your video is running. This feature especially enhances voice
presentations made with low- or mid-quality microphones. Any small voice
distortions are obscured by the background music, enabling your presentation
to approach professional quality without need for a sound studio. The
background audio is not streamed through the Internet but is instead embedded
into the player.
These options allow your viewers to enjoy Openworld Flash Presenter's
advanced "rich presentation" features while conserving Internet bandwidth.
2. Saving your Presentation in several file formats.
Your presentation is now ready to be exported in file formats suitable for
webcasts (viewable online via the Internet), or for local viewing with a
Windows or Macintosh computer in cases where the presentation is to launched
directly from files stored on the users' hard drive, CD-ROM, DVD, or USB
drive.
Your options include:
• saving in the universal Flash (SWF) format for viewing in all
commonly-used web browsers;
• saving as a single executable file in the MS Windows EXE
format; and
• saving as an Apple Mac OS X application that contains
all of the components of your presentation.
IMPORTANT: Regardless of which output
format you choose for your presentation, you will have three options for
loading the video/audio track into your presentation:
• Local File (or HTTP Progressive Download for online
presentations). Choosing this video/audio loading option is most suitable
when presentation is oriented to offline playback.
• HTTP Streaming. Choosing the HTTP Streaming option is
the best options when presentation is oriented to online delivery, but
RTMP-compliant server can't be used for some reason. In this case presentation
can be uploaded to any HTTP (web) server with a scripting language (like PHP)
and a database engine (like MySQL) support.
• RTMP Streaming. The RTMP Streaming option is the
preferred choice for online presentations, when RTMP-compliant server (like
Adobe Flash Media Server) is available. In this
case the video/audio track is delivered through a RTMP-server, whereas all
other presentation parts (which always are in SWF format) are delivered through
usual web (HTTP) server of any type.
See below for more information about several video loading methods. The
video loading method is accessible through the Video Delivery Method
drop-down list in the Export Properties page.
Online/Offline Presentation in Flash format
If you save the presentation in Flash (SWF) format, you have the option of
webcasting it by uploading it to a webserver, or alternately, of launching
it locally using
Adobe Flash Player. Saving the presentation in
Flash format will allow you to choose the way you would like the video to be
loaded.
To save in Flash format, choose the "Flash Movie" option from the Output Format
drop-down list in the Export Properties page.
• The individual components (video, slides, Transcript) of the presentation
will be saved automatically in separate folders. These files can be individually
accessed, if desired, for updating and editing.
• Your presentation, once saved in the .swf format, may be uploaded to a
web server or run locally on your computer.
• The presentation can be viewed using Adobe Flash Player, a free software application
from Macromedia/Adobe for playing SWF files.
Offline Presentation in the MS Windows EXE format
If you choose to create a presentation as a single executable file, the
saved .exe file can be burned on CD/DVD or other removable media and easily
launched by the user. All the components of the presentation will play
directly from this single executable file, without having to be saved as
temporary files on the hard disk of your viewer's computer. The need for
installing the presentation files on the user's computer does not arise.
To save your presentation as a Windows EXE file, choose the "Windows
Executable" option from the Output Format drop-down list, located in the
Export Properties page.
• All the components of the presentation such as video, slides and
Transcript will be consolidated into one .exe file. (Such a file cannot be
edited and will be saved in a read-only format.)
• Your .exe presentation can be distributed via a CD-ROM, DVD, or other
removable media - and played on any PC because it contains a built-in Flash
player.
• Your presentation can be exported with an auto-run file to automatically
launch the presentation from a CD.
• Security (password protected) and copyright options (with a unique
program identification number) are available. This option is especially
valuable when you create CD-ROMs or DVDs for commercial distribution.
Offline Presentation in the Apple Mac OS X Application format
If you choose to create a presentation in a Mac OS X Application format, the
saved .zip archived file will contain the APP formatted files structure. It
can be copied to a Mac computer and unzipped by any software, available for
Mac OS, working with ZIP archives. You can download one of free tools from
here.
The unzipped APP file can be burned on CD/DVD or copied to other removable
media, and easily launched by the user. All components of a presentation will
play directly from this application file, without having to be saved as
temporary files on the hard disk of your viewer's computer. Accordingly, there
is no need to place any installation files on the user's computer.
3. Video Delivery.
You may choose to use either the local or the HTTP Progressive Download or
HTTP Streaming mode of delivery for the video, or even opt for RTMP mode of
live streaming from a Adobe Flash Media Server. In the last case please
refer to the Adobe Flash Media Server Documentation to learn
more about how to stream Flash video. You can find the basic instruction of how
to setup Flash Media Server to deliver the video/audio here. The HTTP Streaming
technology is discussed here.
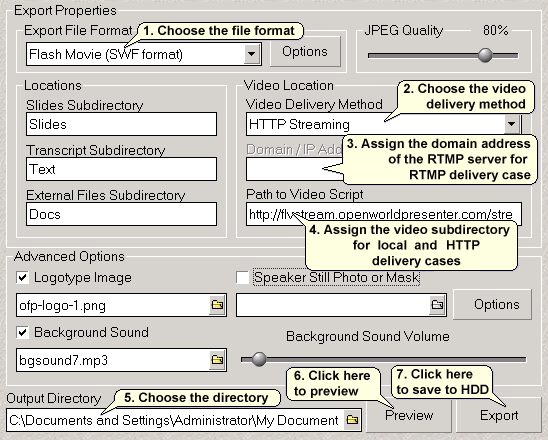
Exporting your Presentation - step by step
Choose the file format for
exporting of your presentation. Please refer to the description above as needed
to understand the difference between Flash, EXE and APP presentation file
formats.
Choose the video delivery method.
Select an appropriate option from the Video Delivery Method dropdown
list in the Export Properties page to select the video delivery mode: either
local/HTTP Progressive Download, HTTP Streaming or via an RTMP server. Refer to
the description above to get more information about each delivery method
advantages.
Assign the Flash Media Server
domain name/IP address if you've chosen the RTMP video delivery method.
Click here to get more
information about server-side configuration.
Choose the video subdirectory
if you have chosen the local/HTTP Progressive Download video delivery option.
The subdirectory should be identified through a relative path (specifying a
single subdirectory name) rather than full directory pathname where the
subdirectory is located on your individual computer. Your video will be saved
in this subdirectory within the presentation export directory.
You must specify the full
pathname (in the form of a URL) to the video delivery script, however,
if you choose the HTTP Streaming method. Click
here to learn more about how to specify this script.
Choose the directory to
export your presentation. Click on the yellow "Folder" button to select the
output directory for exporting your presentation.
You can click "Preview" button
to see how your presentation will look.
Click the "Export" button to
export your presentation into the file format chosen above.
|