Welcome To Openworld FlashPresenter Welcome To Openworld FlashPresenter
Samples Gallery Download
 Download Openworld FlashPresenter Now! Download Openworld FlashPresenter Now!
Overview
Openworld FlashPresenter Features
Getting Started with Openworld FlashPresenter
Your Presentation Screen
PowerPoint Import
PowerPoint Import Wizard Step 1 - Open Presentation Step 2 - PowerPoint Slide Narration
Step 3 - Narration Results PowerPoint Import Preferences
Creating New Presentation
Getting Started Video Setup Video Encoding Setup Transcript Setup Slides Setup
Media Synchronization
Synchronization Overview
Editing Transcript
Synchronizing the Transcript
Contents Creation
Synchronizing Slides
Synchronizing Speakers
Hyperlinks and Resources Links Creation
Synchronizing Hyperlinks and Resources Links
Glossary Building
Creating Quizzes
New Quiz Creation Quiz Properties Setup Quiz Customization Quiz Results Processing
Presentation Export
Exporting Your Presentation Using HTTP Streaming technology for video/audio
delivery
Flash Media Server
Configuration Basics
Accompanying Tools
 Video Converter Video Converter
Video Joiner Video Encoding Preferences MP3 To FLV Converter MP3 Compressor Audio Uncompressor MP3 Sound Recorder
Support
DEMO Mode Limitations Software Activation and Order Information
Contact Information
Credits |
|
Video Converter
How to Convert Your Video Into a Supported Format:
FLV Video Encoder, used in The Openworld FlashPresenter supports only few basic
video compression formats for source video. Such are MPEG-I, MPEG-II, DiVX Low Motion MPEG-4 formats.
So, you can't use it directly if your video is recorded in some more advanced
video formats like Windows Media 9 (a.k.a. WMV3) format and some other.
The main purpose of this tool is to convert your source video into supported video
compression format without extra quality losses. You can choose appropriate video / audio
codecs using the Video Encoding Preferences page. Then you can use Video Converter tool
to convert your video into a supported format.
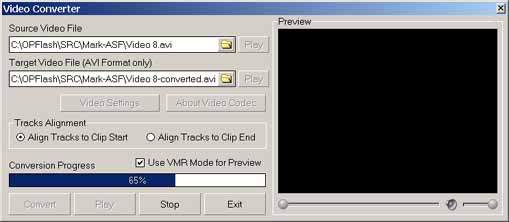
How Video Converter looks:
How Video Converter works:
All you need to do to start conversion process is to assign the source and target file names and
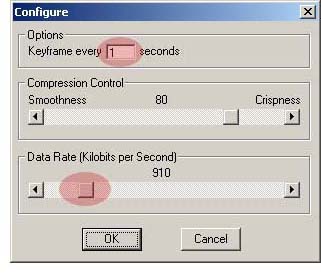
choose encoding parameters by adjusting video codec properties. You can see usual
video codec properties page here. It will depend on the codec chosen, how this page will look,
but in any case you can find two meaningful options there:
 Key Frame Interval It affects to the target file size. The higher is the value the less is the file size
if there are no fast motion scenes in the movie. On the other hand high values, set here,
may lead to inaccurate navigation in the resulting (streaming FLV) video, after you'll use the converted video in the
FLV Video Encoder. So, it is recommended do not set values, higher than 1 sec. here, what
gives one key frame per approx 25 frames. Also please note that actual keyframe rate will depend on
the target bitrate, set in FLV Video Encoder parameters before encoding. Low bitrates will lead to higher
keyframe interval value, but (naturally) will produce video of worse quality. Key Frame Interval It affects to the target file size. The higher is the value the less is the file size
if there are no fast motion scenes in the movie. On the other hand high values, set here,
may lead to inaccurate navigation in the resulting (streaming FLV) video, after you'll use the converted video in the
FLV Video Encoder. So, it is recommended do not set values, higher than 1 sec. here, what
gives one key frame per approx 25 frames. Also please note that actual keyframe rate will depend on
the target bitrate, set in FLV Video Encoder parameters before encoding. Low bitrates will lead to higher
keyframe interval value, but (naturally) will produce video of worse quality.
Target Bitrate defines the bitrate in the converted video.
It is not recommended to set low values here. You main goal now is to get video file
of supported format. Later (in FLV Video Encoder) you'll can choose the target bitrate for your FLV video and even
produce several videos with different bitrates using the same source video file, e.g.
to deliver your content to several target audiences.
You can preview the converted video to check its quality and change encoding parameters if you're not satisfied by the quality or target file size.
IMPORTANT NOTICE: XVID Video Codec has a known bug,
preventing movie playback in so called "compatibility mode". Therefore please ensure
that "Use VMR Mode for Preview" checkbox of the Video Converter is set, when you're using XVID codec.
Another resolution of this bug is to open XVID Video Codec Configuration dialog and
set the "FOURCC" signature to "DIVX" before encoding. Click "Video Settings" button in the Video Converter window,
then click "Other Options" button at the bottom of "XVID Configuration" dialog for that.
Tracks alignment control
It affects to the video vs audio track alignment in the case if track durations
do not coincide. Some web-cameras create videoclips, where audio is a bit longer than video,
which has a small "gap" on beginning. Video track may also be shifted against audio track
within video clip by some reason. You can use the tracks alignment control
to process such incorrectly written video files. Usually you don't need to
change this option, because most of video hardware/software record video/audio
tracks in synch.
IMPORTANT! Using free version of the DivX codec you may see
a logo, appearing at the bottom right screen corner of the video frame, when you preview encoded video file.
This logotype appears on screen only -- it is not embedded into your file. Therefore your final
FLV video file will be free from this logotype.
|