Welcome To Openworld FlashPresenter Welcome To Openworld FlashPresenter
Samples Gallery Download
 Download Openworld FlashPresenter Now! Download Openworld FlashPresenter Now!
Overview
Openworld FlashPresenter Features
Getting Started with Openworld FlashPresenter
Your Presentation Screen
PowerPoint Import
PowerPoint Import Wizard Step 1 - Open Presentation Step 2 - PowerPoint Slide Narration
Step 3 - Narration Results PowerPoint Import Preferences
Creating New Presentation
Getting Started Video Setup Video Encoding Setup Transcript Setup Slides Setup
Media Synchronization
Synchronization Overview
Editing Transcript
Synchronizing the Transcript
Contents Creation
Synchronizing Slides
Synchronizing Speakers
 Hyperlinks and Resources Links Creation Hyperlinks and Resources Links Creation
Synchronizing Hyperlinks and Resources Links
Glossary Building
Creating Quizzes
New Quiz Creation Quiz Properties Setup Quiz Customization Quiz Results Processing
Presentation Export
Exporting Your Presentation Using HTTP Streaming technology for video/audio
delivery
Flash Media Server
Configuration Basics
Accompanying Tools
Video Converter Video Joiner Video Encoding Preferences MP3 To FLV Converter MP3 Compressor Audio Uncompressor MP3 Sound Recorder
Support
DEMO Mode Limitations Software Activation and Order Information
Contact Information
Credits |
|
Hyperlinks and Resources Links Creation
How to Create links to web pages and other resources:
You might want to insert links into your presentation to let viewers browse related web pages and other resources, to gain additional information on the topic of your presentation.
Adding such links to your presentation, is just a simple process.
Use the tool buttons located above the tree-view to manage the link groups and links.
Alternatively, you can right-click to access the popup menu for the same.
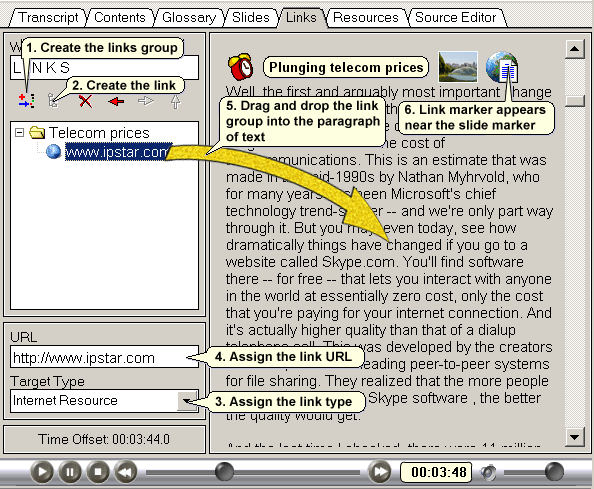
The action sequence for creating links is given below, and the following illustration shows at a glance, the steps involved in the process:
Adding Links and Resources
Note: Links are grouped together on the basis of their time of appearance on screen while the presentation is being run. Each link group may contain as many links as you might wish to have, but only the top four links will be fully visible. Users will need to scroll up to view them while the presentation is running.
1. Creating Link Groups
 Click the "Link Group" icon, located to the extreme left. Click the "Link Group" icon, located to the extreme left.
An empty tree-type entity appears for editing.
Edit the title for the link group (this title does NOT appear in your presentation, but helps you distinguish between the groups of links as you relate them to specific points in the transcript).
Note: The link title will appear as a popup hint when you place the mouse-cursor over the link group icon inserted into the transcript.
2. Creating Links
We've just created the link groups and will now proceed to create the links within the group.
Click the “Add Link” button (to the right of the link group icon).
A new child item appears under the current link group.
Edit the title of this child item.
Note: The link title appears on screen at a pre-set time.
3. Creating Link Attributes
Once a link title has been created, the next step is assign the link's attributes.
First, choose one of the following Link Types
• Internet link
• Contents topic link
• Slide pointing link
• Link to an external file such as .doc, .pdf, etc.
For Internet Link set its attribute by just typing in the relevant URL;
For other three options a small button appears in the Link URL input text field.
Click on the pop up button to choose the object related to the link.
You can't edit the link's URL directly in such cases.
|